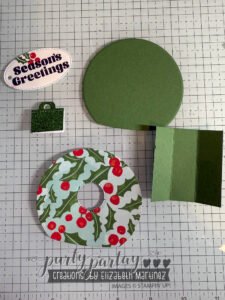
If you love gifting handmade treats during the holidays, this Snow Globe Candy Holder is sure to be a hit! It’s simple, festive, and the perfect way to showcase your favorite holiday DSP and embellishments. Plus, it features one of my favorite seasonal candies—Lindor Peppermint Balls! Here’s how you can make one:

Supplies Needed:
- Snowy Wonder Bundle
- Stylish Shapes Dies (smallest circle)
- Greetings of the Season Dies (oval tag)
- Holiday DSP of your choice
- Coordinating Cardstock
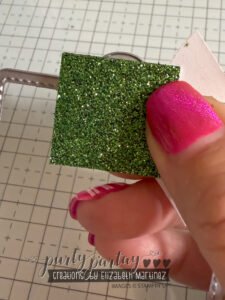
- 2” x 1” Glimmer Paper
- Merry Tags & More Dies (for the tag topper)
- Lindor Peppermint Balls
- Adhesives: Glue, Tear Tape, and Glue Dots
- Ribbon and Twine
Step-by-Step Instructions:
- Die Cutting the Snow Globes:
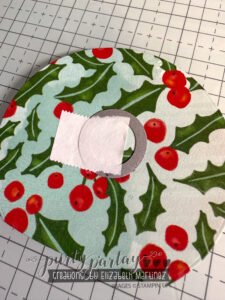
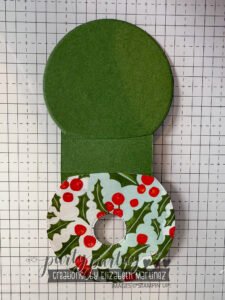
- Cut one large snow globe from your holiday DSP.
- Center the smallest circle from the Stylish Shapes Dies and cut out the middle of the DSP snow globe.
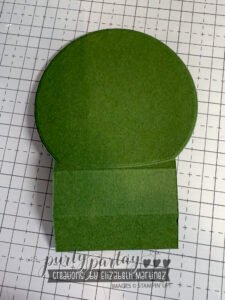
- Cut another large snow globe from coordinating cardstock.
- Creating the Base:
- From the same cardstock used for the snow globe, cut a 2 1/4” x 2 1/4” piece.
- Score it at 3/4” and 1 1/2” to create folds. This will form the base of your candy holder.
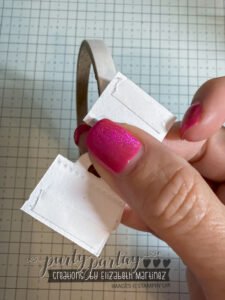
- Making the Tag Topper:
- Cut a 2” x 1” piece of glimmer paper and score it in half, creating a 1” x 1” folded piece.
- Use the Merry Tags & More Dies to cut the top of a tag, positioning the fold just below the die’s top edge to create a fold-over topper.
- Assembling the Snow Globe Holder:
- Attach one DSP snow globe to the front of the base and the cardstock snow globe to the back using adhesive.
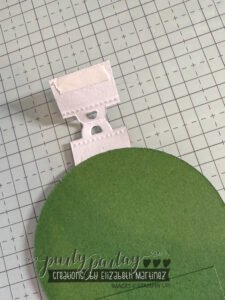
- Attach the folded tag topper to the top of each snow globe using Tear Tape, ensuring it creates a handle-like effect.
- Stamp you Tag!
- Die cut oval tag using the Greetings of the Seasons Dies
- Stamp with Greeting and Holly leaves + berries
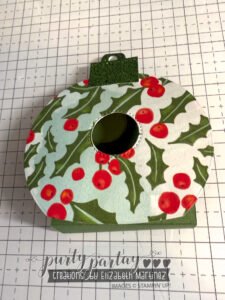
- Adding the Candy:
- Use glue dots to secure the Lindor Peppermint Ball between the snow globes, with the candy showing through the circle cutout on the DSP snow globe.
- Finishing Touches:
- Add a festive tag and tie some ribbon or twine around the top.
- Your adorable giftable is ready to share!

![Snowy Scenes 12" X 12" (30.5 X 30.5 Cm) Designer Series Paper & Sticker Sheet (English) [ 166611 ]](https://assets1.tamsnetwork.com/images/EC042017NF/166611s.jpg "Snowy Scenes 12\" X 12\" (30.5 X 30.5 Cm) Designer Series Paper & Sticker Sheet (English) [ 166611 ]")
![Garden Green 8-1/2" X 11" Cardstock [ 102584 ]](https://assets1.tamsnetwork.com/images/EC042017NF/102584s.jpg "Garden Green 8-1/2\" X 11\" Cardstock [ 102584 ]")
![Gold Twisted Thread [ 164603 ]](https://assets1.tamsnetwork.com/images/EC042017NF/164603s.jpg "Gold Twisted Thread [ 164603 ]")
![Snowy Wonder Bundle (English) [ 164125 ]](https://assets1.tamsnetwork.com/images/EC042017NF/164125s.jpg "Snowy Wonder Bundle (English) [ 164125 ]")
![Greetings Of The Season Dies [ 164112 ]](https://assets1.tamsnetwork.com/images/EC042017NF/164112s.jpg "Greetings Of The Season Dies [ 164112 ]")
![Stylish Shapes Dies [ 159183 ]](https://assets1.tamsnetwork.com/images/EC042017NF/159183s.jpg "Stylish Shapes Dies [ 159183 ]")
![Tuxedo Black Memento Ink Pad [ 132708 ]](https://assets1.tamsnetwork.com/images/EC042017NF/132708s.jpg "Tuxedo Black Memento Ink Pad [ 132708 ]")
![Poppy Parade Classic Stampin' Pad [ 147050 ]](https://assets1.tamsnetwork.com/images/EC042017NF/147050s.jpg "Poppy Parade Classic Stampin' Pad [ 147050 ]")
![Garden Green Classic Stampin' Pad [ 147089 ]](https://assets1.tamsnetwork.com/images/EC042017NF/147089s.jpg "Garden Green Classic Stampin' Pad [ 147089 ]")
![Multipurpose Liquid Glue [ 110755 ]](https://assets1.tamsnetwork.com/images/EC042017NF/110755s.jpg "Multipurpose Liquid Glue [ 110755 ]")
![Mini Glue Dots [ 103683 ]](https://assets1.tamsnetwork.com/images/EC042017NF/103683s.jpg "Mini Glue Dots [ 103683 ]")
![Tear & Tape Adhesive [ 154031 ]](https://assets1.tamsnetwork.com/images/EC042017NF/154031s.jpg "Tear & Tape Adhesive [ 154031 ]")
Leave a Reply