If you have been wondering how to organize Stampin’ Up! stamps and dies, you are definitely not alone. One of the most common questions I get after sharing my craft room Reels is how I keep all of my stamps, dies, and embellishments organized without losing pieces or creating complete crafting chaos.
Over the years, I have tested several paper crafting storage systems, and today I’m sharing exactly how I organize my Stampin’ Up! supplies so they are easy to find, easy to use, and easy to put away. This system has helped me spend less time searching for supplies and more time actually creating.
This post will also serve as the landing page for my organization Reels so you can easily find all the products and storage items I use in one place.
If you love organization ideas, make sure to also check out my Tutorial Vault and current class offerings for even more paper crafting inspiration.
How to Organize Stampin’ Up! Stamps and Dies for Easy Crafting
One of the biggest things that helped me organize my craft room was separating my stamps and dies into systems that work independently but still coordinate together.
I recently switched to storing my stamps and dies separately using the newer Stampin’ Up! storage system. Previously, I kept them together in the same package, but separating them has made it much easier to grab exactly what I need while crafting.
This system completely changed how I organize Stampin’ Up! stamps and dies because I can now quickly see everything at a glance without digging through bulky packaging.
Here’s my process:
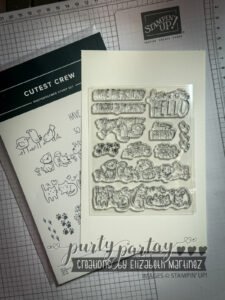
- Remove the thin acetate sheet from the stamp set
- Ink the stamps with a Tuxedo Black Memento Ink Pad
- Stamp the full image set onto the center of the 5″ x 8″ cardstock
- Use Tear & Tape Adhesive to attach the thin acetate sheet over the stamped images
- Leave all stamps attached to the thicker carrier sheet
Now, whenever I use a stamp, I can simply place it stamp-side down into its matching stamped image spot and cover it with the thick carrier sheet again.
This system makes it incredibly easy to see at a glance whether all of my stamps made it back into the case. No more missing sentiment stamps hiding on acrylic blocks for three days. Not that I’ve ever done that… repeatedly. 😉
To see my system in action, click on the image below.
Why I Store My Stamps and Dies Separately
I recently switched to storing my stamps and dies separately using the newer Stampin’ Up! storage system.
Previously, I kept everything together in one package. While that worked for a while, I found that separating them makes it much easier to grab exactly what I need during a project without constantly flipping through bulky cases.
It also helps reduce wear and tear on the stamp packaging and keeps everything cleaner and easier to maintain long-term.
How I Organize My Dies
For my dies, I use a very similar setup.
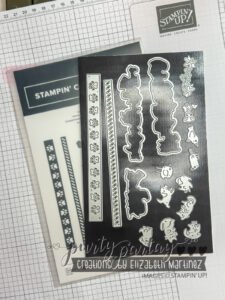
I start with another piece of 5″ x 8″ Thick Basic White Cardstock and pair it with adhesive magnetic sheets that I purchased from Amazon.
Here’s my die storage process:
- Cut the magnetic sheets into two 5″ x 8″ pieces
- Adhere the magnet sheet to the Thick Basic White Cardstock
- Remove all dies from their original packaging
- Arrange the dies directly onto the magnetic sheet
Adding the cardstock behind the magnet sheets makes the storage much sturdier and easier to pull in and out of the storage sleeves.
I also love being able to see every die instantly without them shifting around or getting lost in packaging.
If you have ever played the “where did that tiny leaf die disappear to?” game, you already know why this matters.
To see my system in action, click on the image below.
My Favorite Way to Store Embellishments
Embellishments are probably the easiest supplies to accidentally overbuy and under-organize.
Especially when you open three packs of the exact same gems because you forgot you already had two open. Again… purely hypothetical. 😂
For smaller embellishment storage, I originally started using passport holders after seeing another demonstrator use them. They worked really well for single packs.
But once I started having multiple opened packages of the same embellishment, I needed something larger and more flexible.
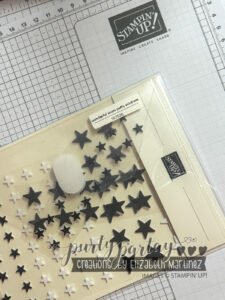
Now I primarily use 5″ x 7″ Velcro envelopes that I found on Amazon.
Inside each envelope, I store:
- Open embellishment packages
- Extra loose pieces
- A small label with the product name
- The item number
You can also include the catalog name or year if you want to be extra organized. I’ll admit… I don’t always remember to do that part, but future organized-me would probably appreciate it if I did.
To see my system in action, click on the image below.
My Favorite Storage Containers from Daiso
One of my favorite craft room finds actually came from Daiso.
I found plastic storage containers that perfectly fit the newer Stampin’ Up! stamp and die storage sizes. They have become one of my favorite ways to keep bundles grouped together and easy to access.
The link below is for a 6 Pack if you order online, but it will give you the item number if you live near a Daiso store!
Supplies I Use for My Craft Room Organization
Here are the main products I use in my organization system:
- Thick Basic White Cardstock
- Tuxedo Black Memento Ink Pad
- Tear & Tape Adhesive
- Adhesive Magnetic Sheets
- 5″ x 7″ Velcro Envelopes
- Avery Passport Holders
- Stampin’ Up! Stamp & Die Organizers
- Daiso Stackable Storage Box Deep (6 pack)
- My Favorite Label Maker
- Die-Cutting Station Scrap Storage
I’ll continue updating this post with direct product links as I add them to my supply list.
Final Thoughts on Craft Room Organization
At the end of the day, organization is personal. What works for me may not work for everyone, and honestly, my systems continue evolving as my collection grows.
The biggest thing I’ve learned is this:
If your supplies are easy to see and easy to put away, you are much more likely to actually use them.
I hope these ideas help you create a craft space that feels inspiring instead of overwhelming.
Be sure to check out my coordinating Reels where I walk through these systems visually and show exactly how I set everything up.
And if you have a favorite organization hack, I’d love to hear it because crafters are basically professional-level problem solvers with glue guns and cardstock.

thank you for the instructions for storing my stamps! it looks so easy. i also appreciate the additional information on what products you use to store your products.